Make Your Own Jellyfish -Tutorial

Last week my daughter had this assignment for school: she had to give class about jellyfish. She had to bring extra material, such as dough figures or a cardboard with pictures in it, but no, not my daughter. She had different plans. Using supplies we already had at home, she had this wonderful idea of making a real-like figure. I must tell you, the results were beautiful!

So, if you happen to have this assignment for homework (by you I mean your kids, of course ;), or if you just want a fun, unexpensive, and easy activity to do with them, this is for you. Making your own jellyfish with recycled materials is as easy as following my daughter’s tutorial (with a few little ideas of mine).
Material:
Plastic bags
Clear hair rubber bands
Wodden stick
Food coloring
Scissors
How to:
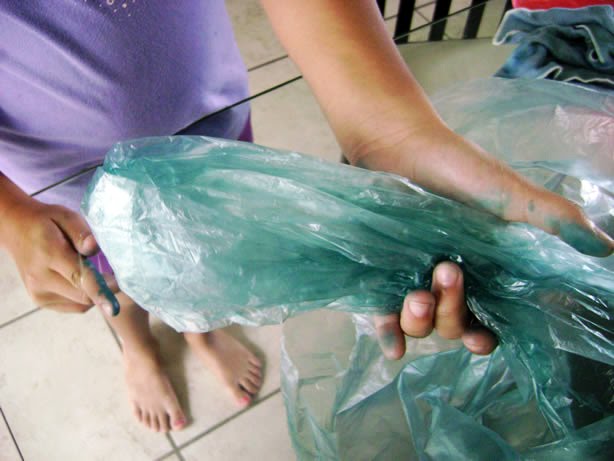
If you want to try for colored jellyfish, use a few drops of food coloring on your bag.
Use your fingers to paint the bag.
Beware of blue fingers!
Turn the bag inside-out. Use the rubber band to mark the division between head and umbrella. The distance depends on the size of your bag, but it’s somewhere between 1/2 and 2/3 of the bag.
Once you put the rubber band, it should look like this.
Use another bag to cut out spirals. This is a step for you, since it’s a little tricky for kids.
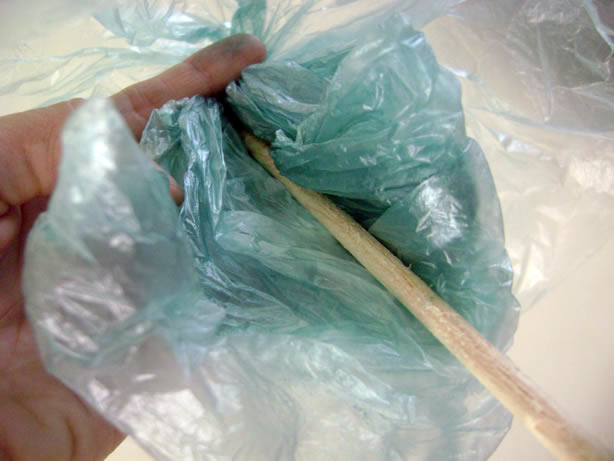
Place the stick on the inside, and secure it with another rubber band. Use this same rubber band to place the spirals in place. (You should take the spirals by the center tip). The spirals are very important for they make pretty tentacles. Do as many as you need (the more, the merrier =).
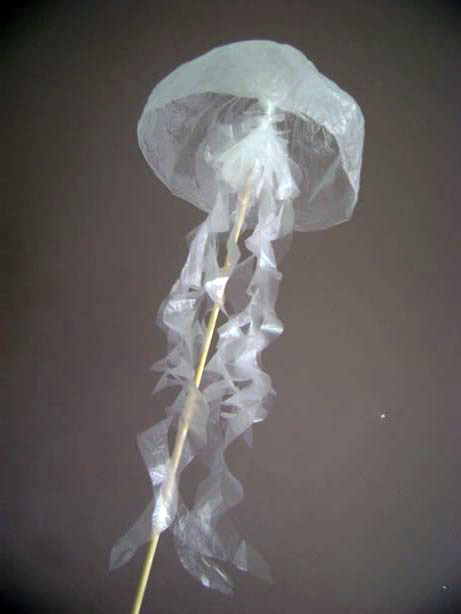
Done!
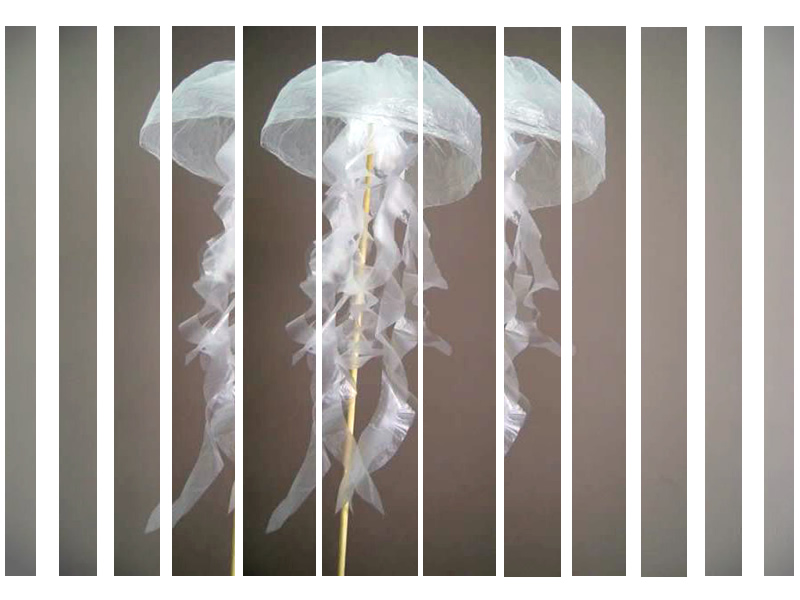
If you leave the bags unpainted, they will make gorgeous white jellyfish.
These jellyfish are very easy to make and you’ll be sure to get great results. If you go up and down with the stick holding the jellyfish, it will move just like the real ones do. That makes them so perfect! My daughter liked them so much, she wanted to keep them in her room as part of her decoration. By the way, her teachers were delighted, for it was a very creative way of reusing materials.
What do you say?
Like ’em?
If you’re up for the challenge, try it out and share your results with me! PS I’m sharing this tutorial at:
My Frugal Family‘s Talented Tuesday
A Silly Little Sparrow‘s Toot Your Horn Tuesday
Coastal Charm‘s Nifty Thrifty Tuesday  
Lucky Star Lane‘s Lucky Linky Tuesday
Hope StudiosTutorial Tuesday
Someday Crafts’ Whatever Goes Wednesday
It’s So Very Cheri’s Spotlight Yourself
Trendy Treehouse’s Creative Share Blog Hop
The Thrifty Home’s Penny Pinching Party
The Shabby Nest’s Frugal Friday
See ya’ in Twitter !

]]>


Comments

20 responses to “Make Your Own Jellyfish -Tutorial”

  1. aaaaah me encanto el proyecto!!! esta padrisimo, la vddes que me encantan las medusas y bueno creo que se deben de ver preciosas como decoracion colgando del techo, no??? creo que lo intentare con mi hijo este fin de semana y te cuento como nos fue 🙂
    El puente estuvo laaaargo y pesado jajaja pero bastante padre porque fui a un lugar donde hacen un show asi como de toros pero como en botargas jajaja super chistoso!!! a ver si subo las fotos al blog, y el tuyo?? un beso!!!!

  2. It really does resemble a jellyfish! Amazing 🙂

  3. thank you for inspiring me! now i know how will i spend time with my cousin's seven – year – old daughter 🙂

  4. These are so cute! I'm a new blog follower – found you on Twitter. You have a wonderful blog.

    Enjoy the weekend.

    Marie
    Sally Lee by the Sea

  5. Those jellyfish are awesome! They really look the part. I know my kids would love to make those and run around the house with them!

  6. I love the jellyfish!! Please pass on my thanks to your daughter for such a great project. I don't have kids but will be making them for my crapht room as decoration.
    Thank you for sharing. ~C8>

  7. Soooo cute! I simply love jelly fishes and these ones especially! They are great 🙂

  8. wow, that really does look easy. And so, so beautiful! Thanks for sharing.

    Brittany
    http://www.prettyhandygirl.com

  9. Thanks so much for posting this great project (with photos & great instructions!). I just finished making one for a lesson I'm teaching on jellyfish tomorrow. Such a great visual for the kids!! Thank you 🙂

  10. Thank you so much for taking the time to post this. I can't wait to do it…plus as a touch of floral spray paint here 'n there. Oh, and shot the finished piece with a fixed 50mm to show of the depth. Yum!

  11. Very cute. I've been making flower poofs and butterflies out of tissues and plastic bags, but this is a beautiful and amazing idea for my son. He already wants to make them and put them up in his room.

    And play with them, he says.

  12. I must admit, I'm a little obsessed over jellyfish. <: They're just so magical, drifting along through the oceans wearing their frills. Like sea fairies in crystal dresses <3
    This tutorial is not only cheap cheap (I save my bags for different reasons already), but simple for the realistic look! I def have this saved for future crafting. <: I intend to take over my bedroom in a jellyfish & stars theme, and this will be great for window charms where the light comes in. 8D I can't wait! Thanks again for this tutorial!

  13. Anonymous Avatar
    Anonymous

    I have been trying to come up with a plan for jellyfish lights! I was making it way more difficult than necessary! This is brilliant and with a couple additions I'll have a light! Thank you!

  14. WOW! I LOVE IT! Thank you for sharing your ingenious tutorial! I plan to make a mermaid kingdom playscape. I would love to include a jellyfish like yours. Thank you so much for your inspiration! love, Jzin, Costa Mesa, California, USA.

  15. This is beautiful! Your daughter is very creative, and your collaboration is fantastic.

  16. Hola, que linda idea! Una duda, qué se le hace a las agarraderas?

  17. Hi, your jellyfish are really fun, and look easy to make too. I made a bigger jellyfish for a theatre show, you can see it here: https://www.youtube.com/watch?v=YIpzJEOWFMg&list=UUFZVTnTRdEVJnPFBXZ8MOeQ
    thanks!

  18. I just love these, thank you for the post!!

  19. María Elena, usé bolsas sin agarraderas, así que no me tuve que preocupar por ellas. 😉 Saludos!!!

  20. Anonymous Avatar
    Anonymous

    I was just wondering what kind of plastic bag you used. I tried using a small trash can liner but it was too thin and didn't have any body to it.

Leave a Reply

Your email address will not be published. Required fields are marked *